Sawasdee Pee Mai Krub !!!!
A new year is about to dawn. I hope for you that it brings happiness and joy.
All the very best for 2011.
Cheers
...
Friday, 31 December 2010
Tuesday, 28 December 2010
Post Just One ?
One of the forums I participate in has a thread titled 'Post Your Favourite Photo of 2010'.
Well, I scratched my chin, thought about it, and really I could not come up with just one. I did a quick check of how many images I've taken this past year, and the grand total is 15,801. That's right 15,801.
This was a few more than I thought I'd taken. Never mind. But, trying to single out just one favourite image ?
For me, that is an impossible task. I did post one, which is the first shown below. It's not necessarily my favourite favourite, but it's still a favourite.
However, many of my images are of activity - People at markets, fishing, salt, rice, pineapple, aloe vera, harvesting, etc. My favourites usually have some form of activity in them. The people make the picture.
So, after digging through all the 1,688 current edits of the images taken this year, I came up with a 'Top 31' selection. Sorry, best I could do. I know 31 does not equal 1, but I really struggled to get it down that low. I also tried to keep 'activity' images to a minimum.
Anyway, here are some of my favourites from 2010. They have meaning for me. I hope you like them also.
Enjoy.


Cheers
...
Monday, 27 December 2010
Time Flies
I was digging through some old files today, well actually I had a hard drive start to play up and when I was copying files off, I came across a whole lot of images.
So, as it happens, got totally side tracked and started doing some edits.
These ones below were taken just over eight years back in New Zealand's South Island. I cannot believe it was that long ago !
Enjoy.
Lupin Fields

Mount Cook

Akaroa

Pier at Akaroa

Maori Church at Akaroa

Le Brons Bay. Beautiful beach, but freezing cold.

Le Brons Bay II

West coast beach at Haast

Pier at Akaroa

Long white clouds

Cheers
...
So, as it happens, got totally side tracked and started doing some edits.
These ones below were taken just over eight years back in New Zealand's South Island. I cannot believe it was that long ago !
Enjoy.
Lupin Fields
Mount Cook
Akaroa
Pier at Akaroa
Maori Church at Akaroa
Le Brons Bay. Beautiful beach, but freezing cold.
Le Brons Bay II
West coast beach at Haast
Pier at Akaroa
Long white clouds
Cheers
...
Sunday, 26 December 2010
More Cool Stuff !!
I know, blowing my own trumpet again !!
Never mind, someone has to.
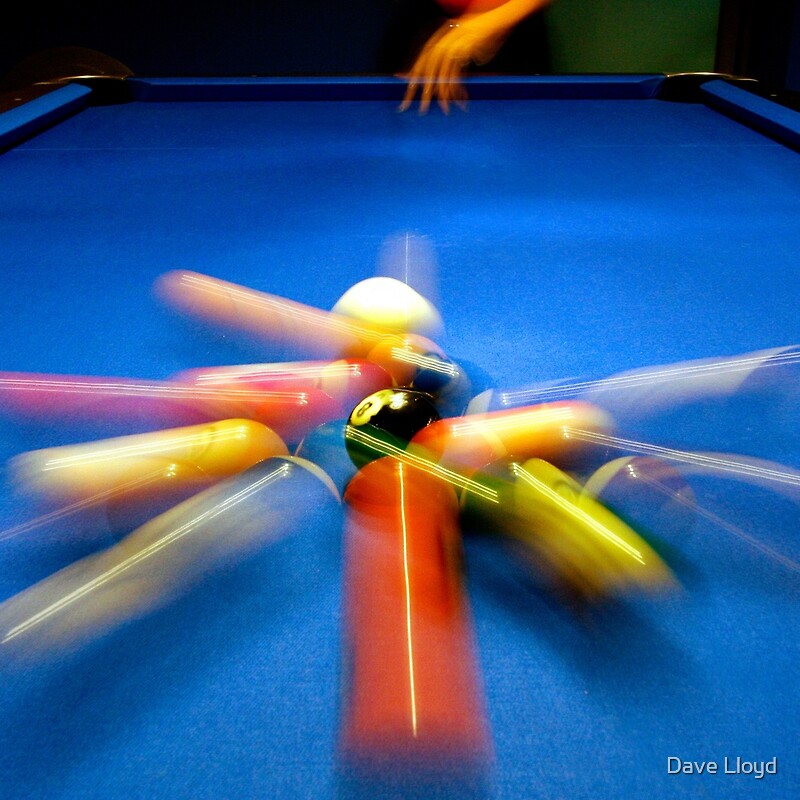
Anyway, woke up this morning to see one of my images had made first place in DPR's Pool/Billiards challenge.
This image was shot quite a while back for a Pool bar promotion in Bangkok. People often ask me if it has been post processed to get the look. No, it is straight from camera. Just lucky.
That's why I have always titled it as 'Lucky Shot'.
Cheers
...
Never mind, someone has to.
Anyway, woke up this morning to see one of my images had made first place in DPR's Pool/Billiards challenge.
This image was shot quite a while back for a Pool bar promotion in Bangkok. People often ask me if it has been post processed to get the look. No, it is straight from camera. Just lucky.
That's why I have always titled it as 'Lucky Shot'.
Cheers
...
Saturday, 25 December 2010
PP Tips 17 - Paint It Black
This is part of a 'How To' series on post process work.
This tip is about using the Vivid Light brush in Photoshop. Similar technique would probably work in any editor which has a paint brush palette where a 'lightening' effect can be applied.
The Vivid Light brush is is one of my favourite tools and is invaluable for adding some extra light, or even darkening parts of an image selectively. In other words, doing localised contrast adjustment.
Image one
This is the original image which I wish to adjust. It is straight from camera.

Image Two
Selecting the paint brush tool from the tools palette, I next select a brush type (soft), and then set the size I wish to use, use the drop down to select Vivid Light, the colour I wish to use and the level of Opacity.
So, my settings are soft brush, Vivid Light, white colour, 380 pixels, Opacity = 5%.
Note : Opacity of 5% is a good all round setting. You can always paint over an area more than once
I have a preset for these values (AA Vivid Light 380) and this is easy to add to the brush menu.

Image Three
Here, I have simply used my 'white' brush to paint over parts of the harvester and also any grass areas. I have avoided the sky and also the bags in the foreground.

Image Four
Having lightened parts of the image, I have now switched my brush colour to black, and painted over the tops of the bags and the grass at the right foreground.

Image Five
Switching back to the white brush, I have now painted over the tops of the bags and some of the grass next to the bags.
What this has done is to create some more localised contrast around the top of the bags.

Well, that's it. Finished.
Image Six
The original, again.
Image Seven
The adjusted image.

Image Eight
The original left, and adjusted image at right.

Hope you found it helpful.
Note : You can use any colour, not just white or black. For example, you may wish to use orange to add lightness, or glow, in areas in a sunset scene. Always good to experiment
Update 26th December - Here are a couple more examples, using the same technique.
Image One
Original image from camera.

Image Two
What I have done here is to do one brush sweep of black over the sky, mountain, tree areas, and then one pass of white.
For the foreground, I have used a couple of passes of white, and then one pass of black, and one more of white. Nothing else was done.

Image Three
The original left, and adjusted at right.

Image Four
The original image, as shot.

Image Five
What I have done here is to do several passes over different areas, simply using white or black. As a final step, I did a pass over the sky area with blue, and a pass over the mountain area with a red/orange shade.

Image Six
The original left, and adjusted at right.

Cheers
Other posts in this series - Click here for the index page.
...
Subscribe to:
Comments (Atom)